Ginetti

Ginetti.

Ginetti are typical Easter cookies, here is the recipe!

Ingredients:

• 10 eggs

• 1 kg of flour

• 1 teaspoon baking powder

• 1 glass of anise

• 300 g sugar

• 1/2 cup of olive oil

• 200 grams of powdered sugar

Mix all ingredients except one egg white and powdered sugar. You’ll have to get a soft and pliable dough.

Form rolls and cut into pieces of 10 cm and seal like a donut.

Boil the ginetti in water  for 5 minutes, then drain gently and let them cool. Cut all around at half height, then bake at 200 ° c for 20 minutes.

Prepare the frosting slamming the egg white with the icing sugar and cover the ginetti. If you want you can also decorate them!

DSCF0691

Ginetti… la ricetta!

Ingredienti:

  • 10 uova
  • 1 kg di farina
  • 1 bustina di lievito per dolci
  • 1 bicchierino di anice
  • 300 gr di zucchero
  • 1/2 bicchiere di olio di oliva
  • 200 gr di zucchero a velo

Procedimento:

Impastate tutti gli ingredienti tranne un albume e lo zucchero a velo. Dovrete ottenere un impasto morbido e malleabile.

Formate dei rotolini spessi un dito e tagliateli a pezzi di 10 cm e chiudeteli a ciambella.

Fate bollire in acqua i Ginetti per 5 minuti, poi scolateli delicatamente e lasciateli intiepidire. Incideteli tutto intorno a metà altezza, poi infornateli a 200°c per 20 minuti.

Preparate la glassa sbattendo l’albume con lo zucchero a velo e ricoprite i Ginetti dopo averli fatti raffreddare. Se desiderate li potete decorate con codette colorate!

Cuculi di Pasqua

Cuculi di Pasqua.

Cuculi di Pasqua are an Easter sweet recipe typical from South Italy.

Ingredients:

1 kg of flour
4 eggs
150 g of sugar
200 ml of milk
150 g butter, melted
50 ml of anise liqueur (optional)
grated rind of 1 lemon
half a cube of yeast
100 ml of water
5/6 raw eggs with shells for garnish

In a planetary (if you have one) or in a large bowl, whisk the eggs with the sugar, slowly add the milk, melted butter, anise liqueur and yeast dissolved in water (add half a teaspoon of sugar in water to activate the yeast).

After obtaining a homogeneous mixture, slowly add the sifted flour, trying to make a soft dough. (you will realise immediately  if you need to add more flour than necessary, you will have to stop when the dough is soft but not sticky on your hands).

Cover the dough and let it rest for about 3 hours.

Once risen, divide the dough into 5/6 portions and roll into balls. Spacing them on a pastry board (previously floured, otherwise they stick !!) cover them and let them rest for an hour.

After this time, form sausages with the dough, arrange them in the shape of U, place a raw egg in the curvature and twist the two parts by passing the ends over each other.

Place on a board and let rise for another two hours.

Brush them with milk or egg place them on a baking sheet and bake in a preheated oven at 160 °c for 45-60 minutes, until Golden.

336584504 images

Ingredienti:

1 kg di farina
4 uova
150 g di zucchero
200 ml di latte
150 g di burro fuso
50 ml di liquore all’anice (facoltativo)
buccia grattugiata di 1 limone
Mezzo cubetto di lievito di birra
100 ml di acqua

5/6 uova crude con guscio per guarnire


In una planetaria  (se ne possedete una) o in una ciotola capiente montare le uova con lo zucchero,  aggiungere lentamente il latte, il burro fuso, il liquore all’anice e il lievito di birra sciolto in acqua (aggiungere mezzo cucchiaino di zucchero nell’acqua per attivare la lievitazione)

Una volta ottenuto un impasto omogeneo, aggiungere lentamente la farina setacciata, cercando di ottenere un impasto morbido. (Vi rederete subito conto se sarà necessario aggiungere più farina del dovuto, dovrete smettere quando l’impasto sarà morbido ma non appiccicherà alle mani:))

Coprire l’impasto e lasciarlo riposare per 3 ore circa.

Una volta lievitato, dividere l’impasto in 5/6 porzioni e formare delle palline. Distanziarle su una spianatoia (precedentemente infarinata, altrimenti si attaccano!!) coprirli e farli riposare per un’oretta.

Trascorso questo tempo, formare dei salsicciotti con le mani, disporli a forma di U, adagiare un uovo crudo nella curvatura (come in foto) e intrecciare le due parti facendo passare le estremità una sull’altra.

disporre su una spianatoia e lasciarli lievitare per altre due ore.

Spennellare con latte o uovo i cuculi, disporli su una placca da forno e infornare in forno preriscaldato a 160° per 45/60 minuti, fino a completa doratura.

Nutella Sunflower

Nutella Sunflower.

Nutella sunflower… this simple recipe is delicious and beautiful!

Ingredients:

  • 2 round puff pastry layers
  • 200 gr of Nutella
  • 30 gr milk
  • 10 gr of powdered sugar

Preheat oven to 180º. On a baking sheet lined with parchment paper, put the first disc of puff pastry, spread Nutella, leaving half a centimeter free all around the edge. Place the second disc on top.

Put a glass in the middle and press down gently. Using the blade of a knife, carve the dough into four equal parts without going to the center. Continue to divide, to get as many rays. Keep the tip of each piece and rotate three times. Brush the top with a little ‘milk and sprinkle powdered sugar.

Bake for 25-30 minutes or until it is golden brown., Let lt cool, remove the parchment paper and transfer it on a tray.

file_545aa13043007

Ingredienti:

  • 2 dischi di pasta sfoglia
  • 200 gr di Nutella
  • 30 gr di latte
  • 10 gr di zucchero a velo

Preriscaldare il forno a 180º. Su una teglia foderata con carta da forno, mettere il primo disco di pasta sfoglia, spalmare la nutella, lasciando mezzo centimetro libero tutto intorno al bordo. Posizionare il secondo disco sulla parte superiore.

Mettete un bicchiere al centro e premere leggermente. Utilizzando la lama di un coltello, incidete l’impasto in quattro parti uguali senza arrivare al centro. Continuate a dividere, per ottenere tanti raggi. Tenete la punta di ogni pezzo e ruotare tre volte. Spennellate la parte superiore con un po’ di latte e cospargete lo zucchero a velo.

Infornate per 25-30 minuti o fino a quando sarà ben dorato sulla parte superiore.Toglietela dal forno, fatela raffreddare, rimuovete la carta da forno e trasferitela su un vassoio.

Strawberry Rolls

Strawberry Rolls.

Strawberry Rolls look like cinnamon rolls but taste like my favourite fruit!

Ingredients:

For the Strawberry Filling:

  • 1 1/2 cups fresh strawberries, chopped into tiny pieces
  • 1/3 cup granulated sugar
  • 1 1/2 tablespoons cornstarch

For the Dough:

  • 2 3/4 cups all-purpose flour, divided, plus extra for dusting
  • 3 tablespoons granulated sugar
  • 1/2 teaspoon table salt
  • 2 1/4 teaspoons instant dry yeast
  • 1/2 cup water
  • 1/4 cup milk
  • 3 tablespoons unsalted butter
  • 1 large egg, at room temperature

For the Vanilla Glaze:

  • 1 cup of confectioners’ sugar
  • 1 teaspoon vanilla extract
  • 2 tablespoons of milk


To make the Strawberry Filling:

  1. Place the chopped strawberries in a small saucepan over medium-heat. Cook for 6-8 minutes, stirring constantly, or until the strawberries are very soft and their juices have been released. Add in the sugar and cornstarch and continue to cook – and stir – for another 1-2 minutes.  Chill filling completely before use.

To make the Dough:

  1. In a large bowl combine 2 1/4 cups of the flour, the granulated sugar, salt, and yeast; mix well to evenly combine. Set aside.
  2. In a small saucepan over medium heat, warm the water, milk, and butter until the butter is completely melted and the mixture is hot to the touch but not scalding. Stir the liquid mixture into the flour mixture. Add in the egg, then add in at least 1/3 of additional flour. You may need to add up to 1/2 cup of additional flour.
  3. Scoop the dough out and transfer it to a lightly floured work surface; gently knead the dough by hand for 3 minutes. Lightly spray a clean bowl with non-stick spray, then set the ball of dough inside. Cover the bowl with plastic wrap and set aside to rest for 20 minutes.
  4. After the 20 minutes have passed, roll the dough out into a 14×8″ rectangle. Spread the cooled strawberry filling on top, leaving a 1″ boarder around the edges. Roll the dough up tightly along the edge  letting it rest on the seem. Cut the roll into 10-11 pieces, then arrange them in a lightly greased 9″ round or square baking dish. Loosely cover the rolls with plastic wrap and set them in a warm, draft-free place to rise for 1 1/2 hours.
  5. Once the rolls have doubled in size, preheat the oven to 375°F. When the oven comes to temperature, bake the rolls for 25-30 minutes, or until slightly browned. After 15 minutes, you’ll want to rotate the pan in the oven and cover the rolls with aluminum foil, to avoid heavy browning.

To make the Vanilla Glaze:

  1. In a small bowl combine the confectioners’ sugar, vanilla, and cream; whisk until smooth, adding more cream as needed to reach desired consistency. Drizzle over the rolls right before serving.

e1e17a26e5d8ff6d61e4af8db0f13664

Strwberry rolls, somigliano ai buonissimi cinnamon rolls ma sono meno dolci e fragolosi!

Ingredienti per il ripieno di fragole:

  • 1 e 1/2 bicchiere di fragole fresche a pezzetti
  • 1/3 bicchiere di zucchero
  • 1 e 1/2 cucchiaio di amido di mais

Ingredienti per l’impasto:

  • 2 e 3/4 bicchiere di farina + altra farina per spolverare
  • 3 cucchiai di zucchero
  • 1 bustina di lievito di birra
  • 1 cucchiaino di sale
  • 1/2 bicchiere di acqua
  • 1/4 bicchiere di latte
  • 3 cucchiai di burro
  • 1 uovo

Ingredienti per la glassa:

  • 1 bicchiere di zucchero a velo
  • 1 fialetta di vaniglia
  • 2 cucchiai di latte

Per il ripieno di fragole:
Posizionare il fragole tritate in una piccola casseruola a fuoco medio-calore. Fate cuocere per 6-8 minuti, mescolando continuamente, o fino a quando le fragole sono molto morbidi. Aggiungere lo zucchero e l’amido di mais e continuare a cuocere – e mescolare – per altri 1-2 minuti. Lasciate raffreddare completamente.


Per fare la pasta:
In una ciotola unire 2 1/4 tazze di farina, lo zucchero semolato, il sale e lievito;
In una piccola casseruola a fuoco medio, scaldare l’acqua, il latte, il burro e fino a quando il burro è completamente sciolto e la miscela è calda al tatto, ma non bollente. Mescolare la miscela liquida nella miscela di farina. Aggiungere l’uovo, quindi aggiungere almeno 1/3 di farina supplementare. Potrebbe essere necessario aggiungere fino a 1/2 tazza di farina in più.
Trasferite l’impasto su un piano di lavoro leggermente infarinato; delicatamente impastare la pasta a mano per 3 minuti. Leggermente coprite di olio una ciotola pulita e poneteci l’impasto. Coprite la ciotola con pellicola trasparente e mettere da parte a riposare per 20 minuti.
 Dopo i 20 minuti, stendete la pasta in un rettangolo. Distribuire il ripieno alla fragola raffreddato sull’impasto, lasciando spazio intorno ai bordi. Arrotolate l’impasto e Tagliate il rotolo in 10-11 pezzi, poi disporli in una teglia. Coprite i rotoli con pellicola trasparente e metteteli in un luogo caldo e senza correnti a lievitare per 1 1/2 ore .
Una volta che i rotoli si sono raddoppiate in termini di dimensioni, preriscaldare il forno a 220° C. Infornate per 25-30 minuti, o fino a quando leggermente dorati. Dopo 15 minuti, consiglio di ruotare la teglia in forno e coprire i rotoli con un foglio di alluminio, per evitare di farli bruciare.


Per la glassa:

In una ciotola mescolate tutti gli ingredienti e una volta ottenuto la glassa coprite i rolls subito prima di servire.


Glazed Donuts

Glazed Donuts

Glazed Donuts… the recipe!

Ingredients:

  • 2 Tablespoons of active dry yeast 
  • 1/4 cup warm water
  • 1 1/2 cups lukewarm milk
  • 1/2 cup white sugar
  • 1 teaspoon salt
  • 2 eggs
  • 1/3 cup shortening
  • 5 cups all-purpose flour
  • 1 quart vegetable oil for frying
  For the glaze:           
  • 1/3 cup butter
  • 2 cups confectioners’ sugar
  • 1 1/2 teaspoons vanilla extract
  • 4 tablespoons hot water or as needed


  1. Sprinkle the yeast over the warm water, and let stand for 5 minutes, or until foamy.
  2. In a large bowl, mix together the yeast mixture, milk, sugar, salt, eggs, shortening, and 2 cups of the flour. Mix for a few minutes at low speed, or stirring with a wooden spoon. Beat in remaining flour 1/2 cup at a time, until the dough no longer sticks to the bowl. Knead for about 5 minutes, or until smooth and elastic. Place the dough into a greased bowl, and cover. Set in a warm place to rise until double. Dough is ready if you touch it, and the indention remains.
  3. Turn the dough out onto a floured surface, and gently roll out to 1/2 inch thickness. Cut with a floured doughnut cutter. Let doughnuts sit out to rise again until double. Cover loosely with a cloth.
  4. Melt butter in a saucepan over medium heat. Stir in confectioners’ sugar and vanilla until smooth. Remove from heat, and stir in hot water one tablespoon at a time until the icing is somewhat thin, but not watery. Set aside.
  5. Heat oil in a deep-fryer or large heavy skillet to 350 degrees F (175 degrees C). Slide doughnuts into the hot oil using a wide spatula. Turn doughnuts over as they rise to the surface. Fry doughnuts on each side until golden brown. Remove from hot oil, to drain on a wire rack. Dip doughnuts into the glaze while still hot, and set onto wire racks to drain off excess. Keep a cookie sheet or tray under racks for easier clean up.

6175077891_f458bdc90e_b

Ingredienti:

  • 2 cucchiai di lievito (io uso mastro fornaio)
  • 1/4 bicchiere di acqua tiepida
  • 1 bicchiere e 1/2 di latte tiepido
  • 1/2 bicchiere di zucchero
  • 1 cucchiaino di sale
  • 2 uova
  • 1/3 bicchiere di strutto
  • 5 bicchieri di farina
  • olio per friggere

Per la glassa:

  • 1/3 bicchiere di burro
  • 2 bicchieri di zucchero a velo
  • 1 fialetta di vaniglia
  • 4 cucchiai di acqua calda


Cospargere il lievito sopra l’acqua calda, e lasciare riposare per 5 minuti.

In una grande ciotola, mescolare insieme i composto di lievito, latte, zucchero, sale, uova, strutto, e 2 bicchieri di farina. Lavorate bene e poi aggiungete il resto della farina e lavorate fino a quando l’impasto diventa liscio ed elastico.

Mettete in una ciotola unta di olio e lasciate lievitare e raddoppiare di misura.

Girate l’impasto su una superficie infarinata e stendete l’impasto. Tagliate dei cerchi con un taglia biscotti rotondo o con un bicchiere e usare una formina più piccola per fare il buco al centro. Lasciate di nuovo lievitare i donuts.

In un pentolino sciogliete il burro, aggiungete lo zucchero a velo e la vaniglia. Togliete dal fuoco e aggiungete un cucchiaio di acqua calda per volta. Ia glassa deve essere non troppo scorrevole.

Friggete i donuts in olio bollente fino a quando entrambi i lati diventano dorati. Quando ancora caldi immergeteli nella glassa!

Red Velvet Frosting

Red Velvet Frosting.

This Red Velvet Frosting is perfect to decorate cakes or cupcakes and it tastes like red velvet!

Ingredients:

  • 1 cup of soft butter
  • 8 oz cream cheese
  • 2½ teaspoons vanilla extract
  • 2 teaspoons red food coloring
  • 4½ cups confectioners’ sugar
  • ¼ cup  unsweetened cocoa

With a handheld mixer and large bowl, beat butter on medium speed until creamy. Add cream cheese; beat until fully incorporated. Add vanilla and food coloring and mix until well blended. Continue beating until light and fluffy.

In a large bowl, whisk together sifted confectioners’ sugar and cocoa. Gradually add confectioners’ sugar and cocoa mixture, beating on low speed  until well combined.
48792225_9cc138cd78
Ingredienti:
  • 1 bicchiere di burro morbido
  • 1 bicchiere di formaggio spalmabile
  • 1 fialetta di vaniglia
  • 1 cucchiaio di colorante rosso
  • 4 bicchieri e 1/2 di zucchero a velo
  • 1/4 bicchiere di cacao amaro

Montate burro fino a diventare cremoso, aggiungete il formaggio e continuate a montare aggiungendo vaniglia e colorante rosso. Aggiungete il resto degli ingredienti e continuate a montare fino a diventare tutto liscio.

Potete usare questo frosting per coprire torte o decorare cupcake…

cupcake-san-valentin_grande

Tiramisù Mousse

Tiramisù Mousse

Tiramisù is one of my favourite desserts. Easy to make, creamy and perfect fo any occasion. Here is a recipe that tastes like tiramisù but is light like a cloud!

To make tiramisù mousse you need:

  • Coffee
  • 1 cup whipped cream
  • 1 and 1/2 cups powdered sugar
  • 1 cup mascarpone
  • cocoa powder
  • chocolate shaving

You can also decide to make a base in your mousse cups or glasses by dipping some ladyfingers in coffee.

 Mix powdered sugar and mascarpone with a hand mixer until smooth then mix in 1 tablespoon of coffee. You can add more coffee depending on how strong you want the flavour to be.

Fold whipped cream into coffee mixture gently and add the mixture in a piping bag.

At this point if you decided to use even ladyfinger dipped in coffee and them at the bottom of the glass then pipe the mousse in the glass. Dust with cocoa powder and if you like decorate with chocolate shavings!

tiramisumousse-500x500

Mousse al Tiramisù:

  • caffè
  • 1 bicchiere di panna montata
  • 1 bicchiere e 1/2 di zucchero a velo
  • 1 bicchiere di mascarpone
  • cacao

Questa ricetta è pensata per dei mini dessert, per porzioni più grandi basta moltiplicare gli ingredienti.

Potete anche decidere di fare una base nei bicchieri con i savoiardi inzuppati nel caffè.

Montate lo zucchero a velo  con il mascarpone poi aggiungete un cucchiaio di caffè. Potete aggiungerne di più, a secondo dei vostri gusti. Incorporate delicatamente la panna e mettete il composto in una sac a poche per riempire i bicchieri. A questo punto potete disporre sul fondo i savoiardi inzuppati e riempire i bicchieri spolverandoli con cacao!

Love Message Cheesecake Hearts

Love Message Cheesecake Hearts.

Love Message Cheesecake Hearts is a colorful, sweet and delicious dessert idea to express your feelings on Valentine’s day!

You will need silicone heart shaped molds.

Ingredients:

  • 1 cup graham cracker crumbs
  • pinch of cinnamon
  • 4 tablespoons  butter, melted
  • 16 ounces  cream cheese, softened
  • 1 cup sugar
  • 3 large eggs
  • 16 ounces sour cream
  • 1 teaspoon vanilla extract
  • food coloring

Preheat oven to 325 degrees.

You will need a water bath to bake your cheesecakes, so put the molds in a pan and fill it half way up with boiling water.

Combine graham cracker crumbs, cinnamon, and melted butter, stirring until it looks like sand. Spoon out about a tablespoon of crumb mixture into each heart cavity. Press the crumbs down making an even crust. 

In a mixing bowl using a hand held mixer, beat the cream cheese on medium high until smooth, scraping down the sides of the bowl as needed. Be sure to scrape the cream cheese out of the mixing blade as well.

Add sugar and beat for one minute. Add eggs and beat until creamy, 1 to 2 minutes, scraping the sides of the bowl once. Add the sour cream and vanilla and mix just to combine.

Equally divide the filling among 6 bowls. Add food coloring to create the colors you’d like.

Pour colored cheesecake filling into the heart shaped cavities in your silicone molds.

Bake cheesecakes in a water bath for 22-25 minutes.

untitled

Love Message Cheesecake Hearts è un colorato, dolce e deliziosa idea per esprimere i propri sentimenti il giorno di San Valentino!

Vi occorreranno degli stampi in silicone a forma di cuore.

Ingredienti:

1 bicchiere di biscotti sbriciolati

1 pizzico di cannella

4 cucchiai di burro

2 bicchieri di formaggio spalmabile

1 bicchiere di zucchero

3 uova

2 bicchieri di panna acida

1 fialetta di vaniglia

colorante alimentare


Preriscaldate il forno a 180°c.

Avrete bisogno di un bagno d’acqua per cuocere le vostre torte, in modo da mettere gli stampi in una teglia e riempire fino a metà gli stampini con acqua bollente.

Unite briciole, cannella e burro fuso, mescolando fino a che non appare come la sabbia. Versate il composto sul fondo di ogni cuore e premeteli sul fondo per formare una crosta.

In una ciotola lavorate il formaggio fino a quando è liscio, poi aggiungete lo zucchero, le uova, panna acida e vaniglia.

Dividete l’impasto  e colorate con diversi colori alimentari e riempite gli stampi.

Infornate per circa 25 minuti!

cheesecake2

zChocolat Romantic zbox 12 Key

zChocolat Romantic zbox 12 Key

zChocolat Romantic zbox 12 Key is the most beautiful Valentine’s day chocolate assortment I’ve seen…

Besides being beautiful in looks, it has a beautiful meaning: you give the key to your heart!

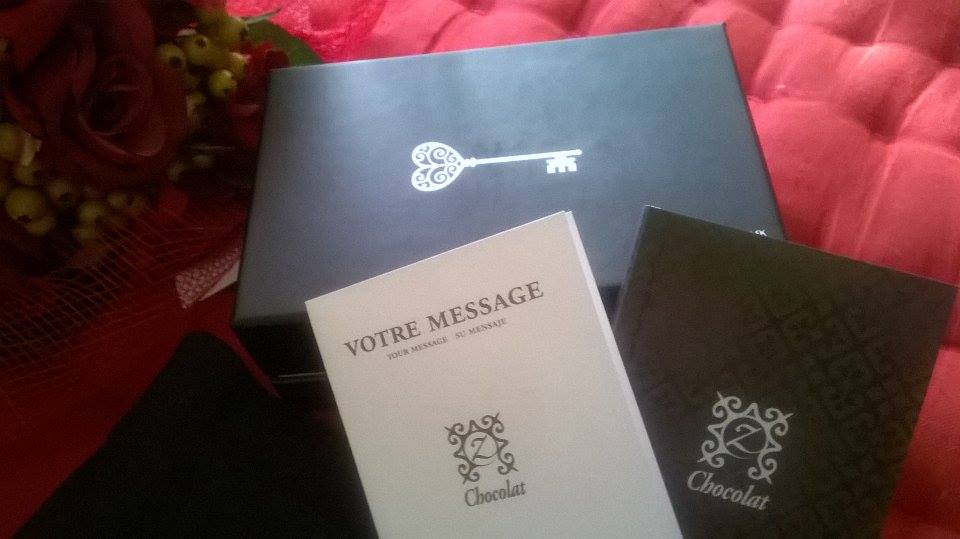
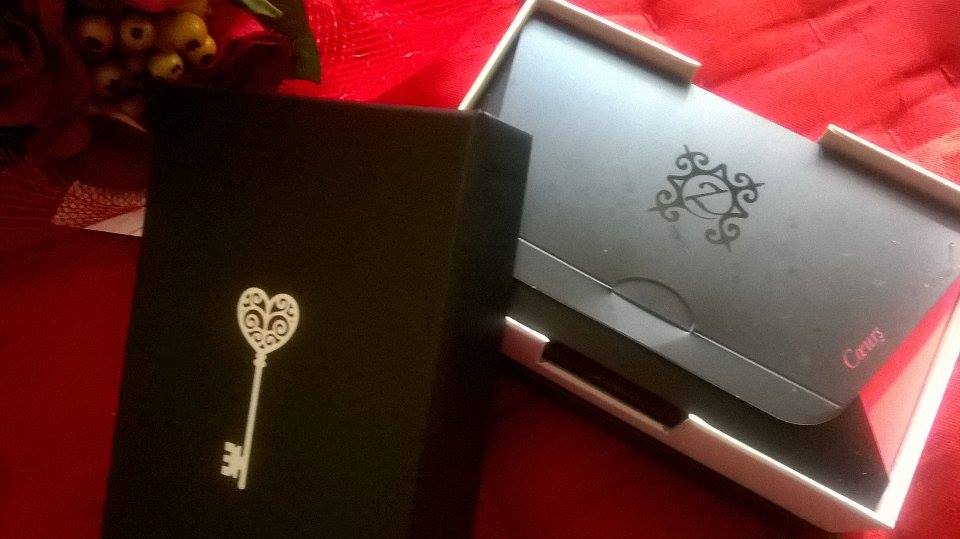
The box is a very good quality black cardboard box with a White key on it… the key… to your heart that is inside the box!

But lets go in order like I Always do to describe and show you this zChocolat box.

One of the factors that distinguish this brand is the cure that put in packaging their products, preparing them for shipping. The box of chocolates arrived in a box with sponges inside to keep it still and protect it from shocks allowing it to arrive in perfect conditions.

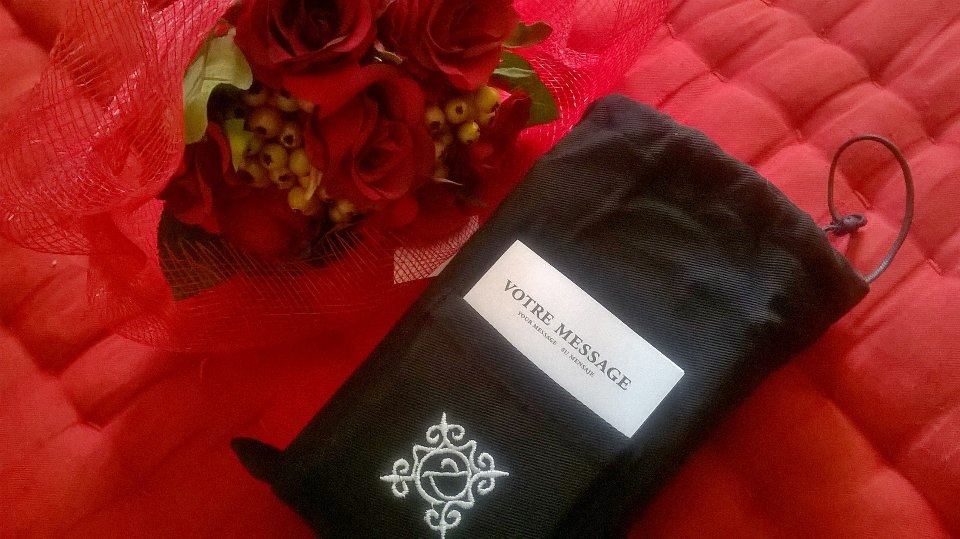
Like all their other boxes even this one comes in a black pouch.

zChocolat Romantic zbox 12 Key  è una delle scatole di cioccolatini per San Valentino più belle che io abbia mai visto…

Oltre ad essere bella da guardare ha anche un bellissimo significato: regalate la chiave del vostro cuore!

La scatola è in un cartone nero molto molto resistente e di ottima qualità con una chiave bianca stampata su di essa… la chiave del vostro cuore che si trova all’interno della scatola!

Ma andiamo per ordina come faccio sempre per mostrarvi i prodotti di zChocolat.

Uno dei fattori che distinguono questo marchio è la cura che mettono nel confezionamento dei loro prodotti, preparandoli per la spedizione. La scatola di cioccolatini è arrivato in una scatola con dentro spugne per tenerlo fermo e proteggerlo da urti permettendo così di arrivare in perfette condizioni.

Come tutte le loro altre scatole anche questo arriva in un sacchetto nero.

zchocolat zchocolat

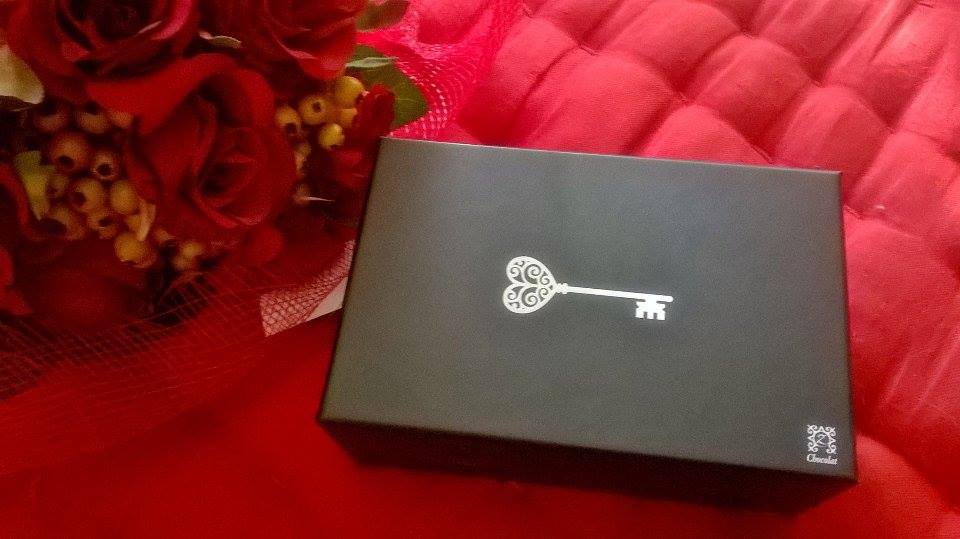
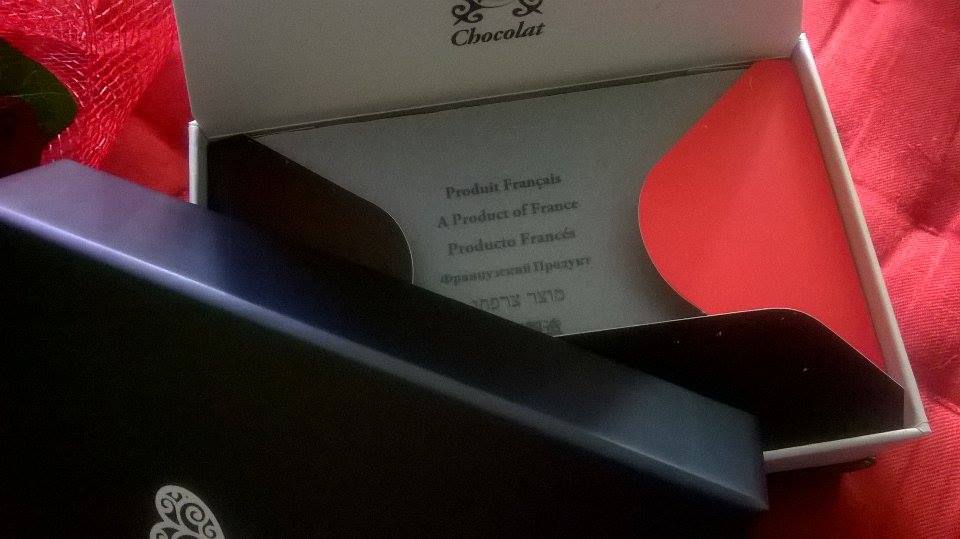
And like the other boxes it will look just the same when you open it, with one difference… one tab on the box is red to recall the theme of Valentine’s Day. That was ingenious because I for sure didn’t expect it at all.

E come le altre scatole zbox avrà lo stesso aspetto quando lo aprite, ma con un differenza… una delle linguette della scatolina che contiene i cioccolatini è rosso per richiamare il tema di San Valentino. è geniale perché di sicuro non me lo aspettavo.

zchocolat zchocolat

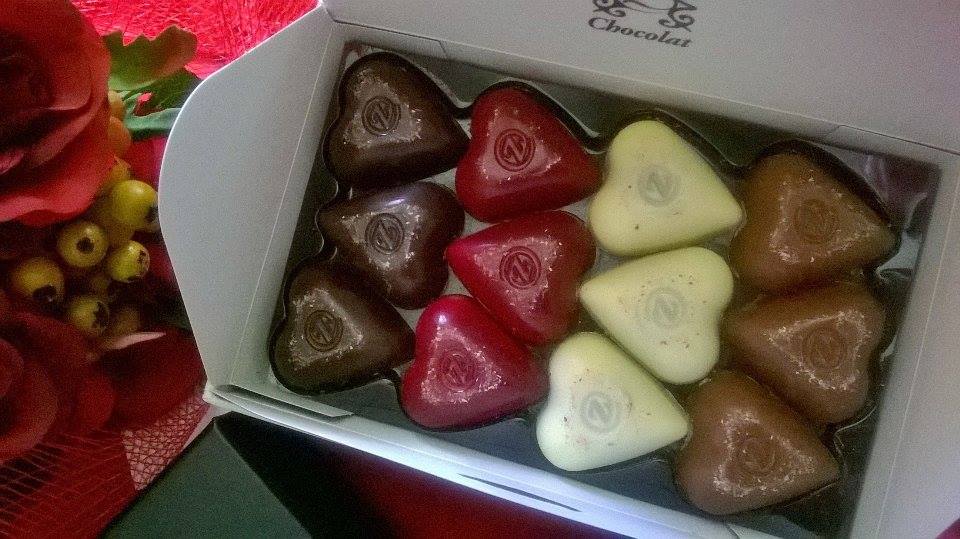
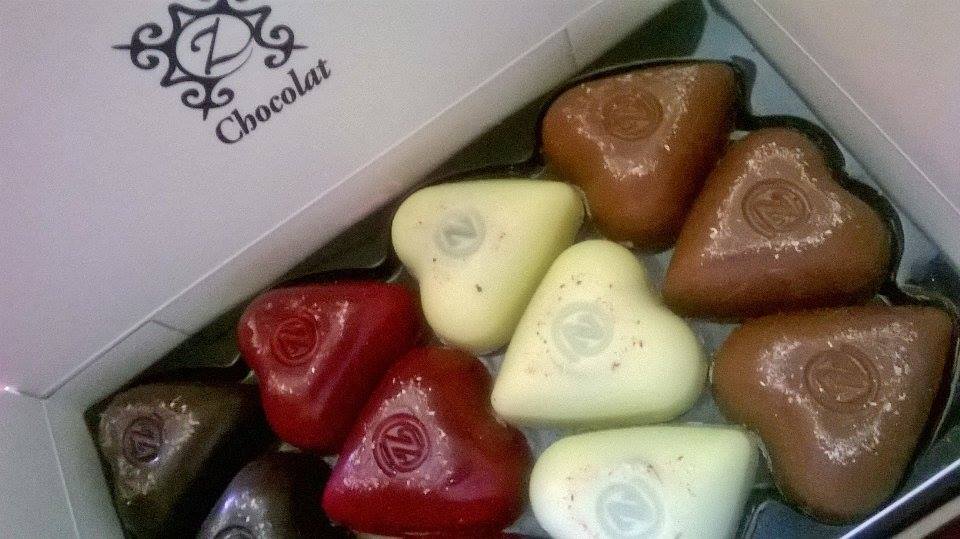
When I opened the box I couldn’t stop staring at those red hearts!

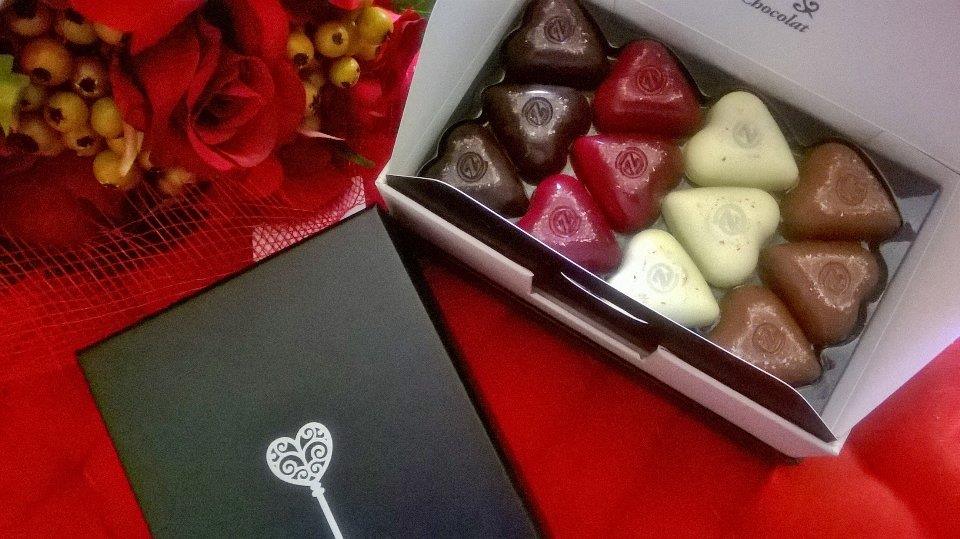
This zbox contains 12 hearts, 3 milk chocolate ones, 3 dark chocolate ones, 3 White ones and 3 red ones…

Quando ho aperto la scatola non riuscivo a smettere di guardare quei cuori rossi!
Questa scatola contiene 12 cuori, 3 al cioccolato al latte, 3 fondenti, 3 al cioccolato bianco e 3 rossi…

zchocolatzchocolat

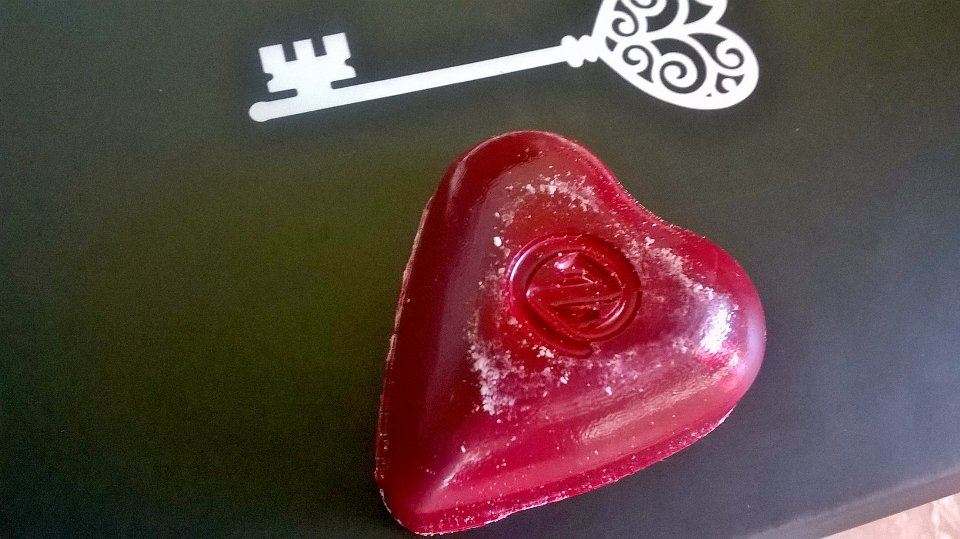
The first one that I went for was the red one, I couldn’t resist!

It is called “Amore” and has a bergamote infused ganache hidden inside a White chocolate heart dressed in red! The ganache is very creamy and decadent… not too sweet and you can slightly taste the bergamote. You taste no artificial taste that you might expect from the red coloring and you hardly taste the White chocolate because the taste that captures your senses comes from the ganache.

Il primo che ho dovuto provare è quello rosso, non potevo resistere!

Si chiama “amore” e ha una ganache all’infuso di bergamotto nascosto in un cuore di cioccolato bianco vestito di rosso! La ganache è molto cremoso e decadente… non troppo dolce e potete sentire leggermente il bergamotto. Non si sente nessun sapore di colorante alimentare che potreste aspettarvi dal colore rosso del cuore e si sente appena il cioccolato bianco perché il sapore che cattura i vostri sensi deriva dalla ganache.

zchocolat zchocolat

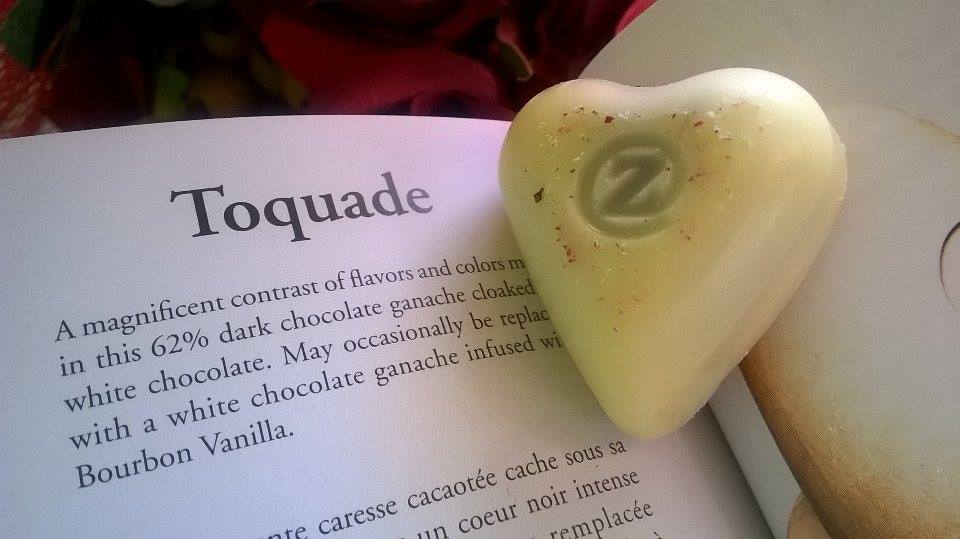
The White heart is called “Toquade” and it’s a White chocolate heart that hugs a decadent very dark chocolate ganache… again… you will really taste the rich flavour of the ganache!

Il cuore bianco si chiama “Toquade” ed è un cuore di cioccolato bianco che abbraccia una decadente ganache al cioccolato molto scuro … nuovamente potete sentire il ricco sapore della ganache!

zchocolat zchocolat

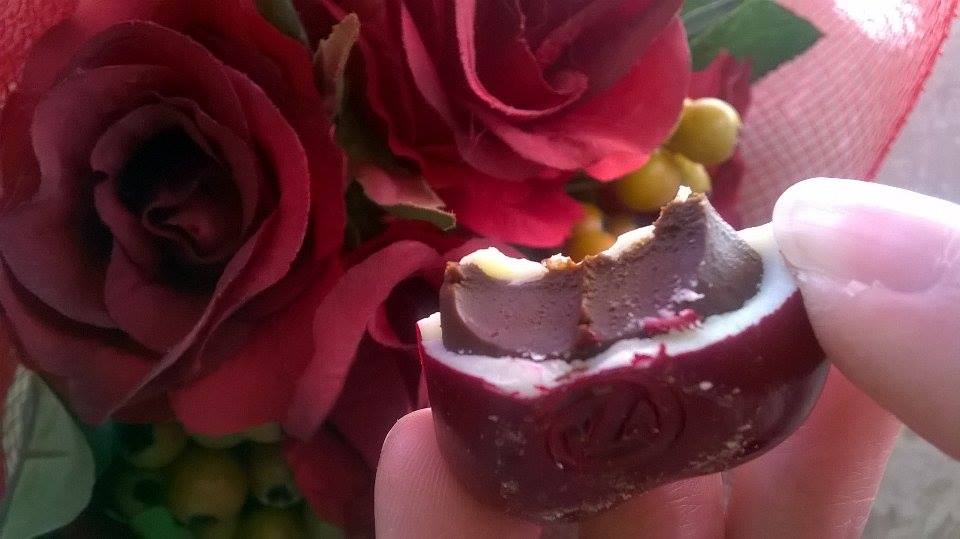
And here are the last two… a milk chocolate one and a dark chocolate one.

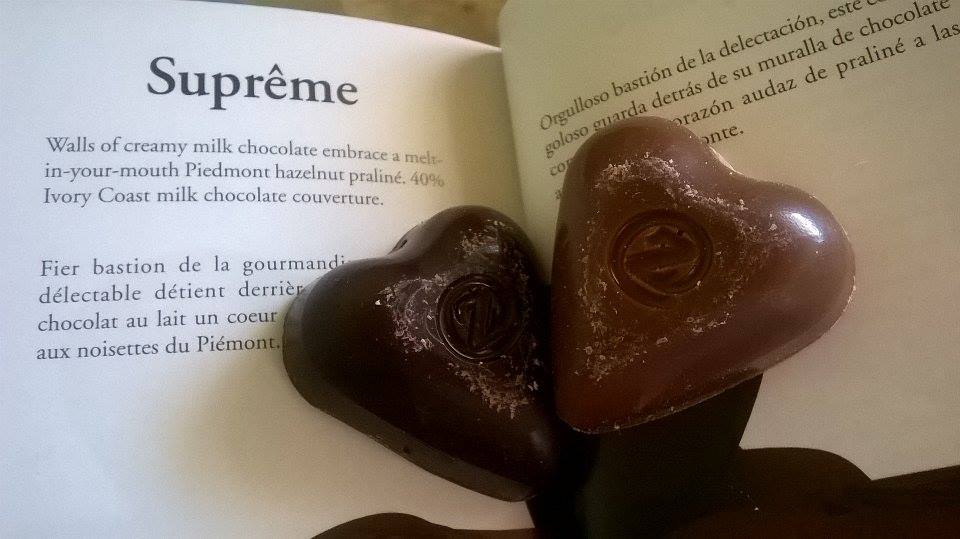
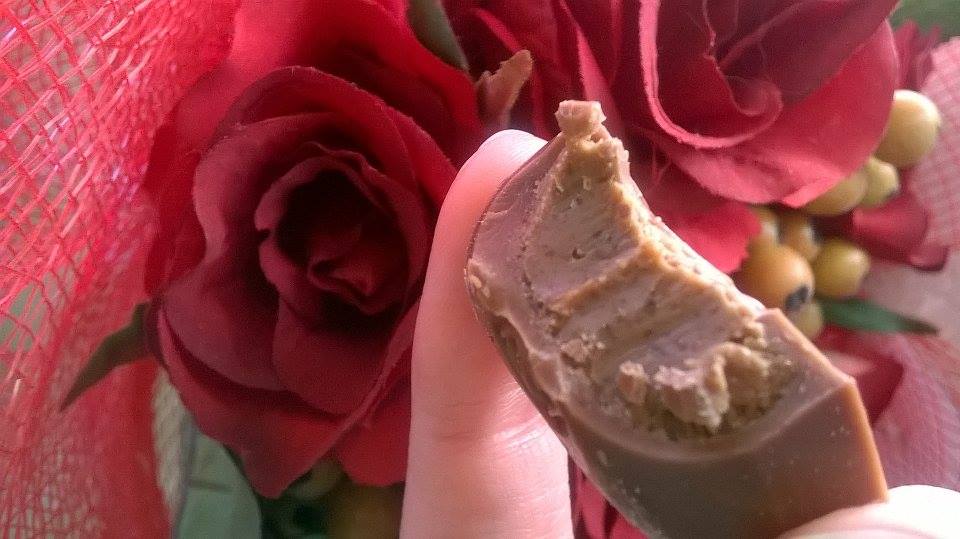
The milk chocolate heart is called ” Supreme”. The milk chocolate heart contains a delicious hazelnut praline with a slight crunchy texture… this is my second favourite after the red heart!

E qui ci sono gli ultimi due… un cuore al cioccolato al latte e uno fondente.

Il cuore al cioccolato al latte si chiama “supreme” e contiene  una deliziosa pralina di nocciole con una leggera consistenza croccante questo è il mio secondo preferito dopo il cuore rosso!

zchocolatzchocolat

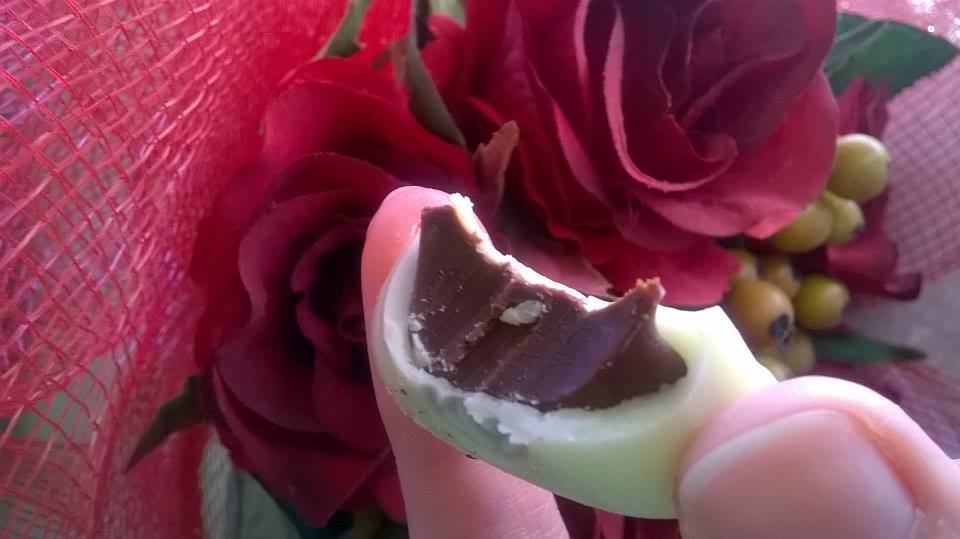
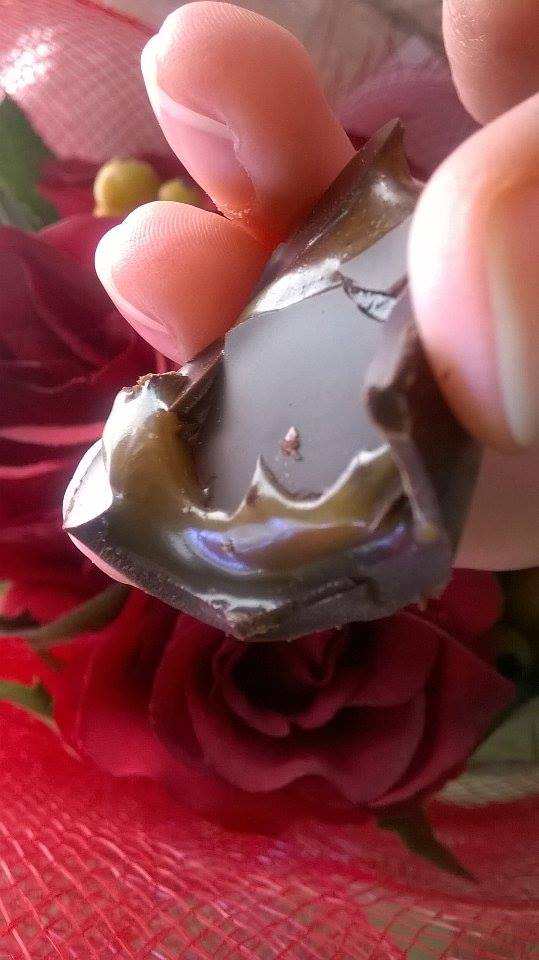
The dark chocolate one is called “Mystique” and it is soo yummy! The dark heart shell is full of a Vanilla Bourbon caramel. The caramel is a sweet one, very different from a salted caramel and tastes like something you would taste on a pastry or a cake…

Quello al cioccolato fondente si chiama “Mystique” ed è molto delizioso! Il guscio al cioccolato fondente è pieno di un caramello alla vaniglia. Il caramello è uno dolce, quindi molto diverso dal caramello salato e ha il sapore di qualcosa che trovereste su un prodotto di pasticceria.

12659757_10153552871728472_168551311_n

The box comes like alway with a little book that describes all zChocolat chocolates and other products with very nice pictures that truely reppresent their products.

If you aren’t buying their chocolates for yourself but for a loved one you can add a message, wrap the box of chocolates, add a seal and a heart shaped padlock!

You can check out zChocolat Valentine’s day collection here: http://www.zchocolat.com/shop/en/106-valentine-s-day-collection

This is definetly a gift that anyone, women or men, would be happy to receive from their loved one on Valentine’s day!

La scatola viene come sempre con un libricino che descrive tutti i prodotti zChocolat con foto che realmente rappresentano i loro prodotti.

è possibile aggiungere un messaggioincartare la scatola di cioccolatini, aggiungere un sigillo e un lucchetto a forma di cuore!

Potete scoprire tutta la collezione di San Valentino qui: http://www.zchocolat.com/shop/en/106-valentine-s-day-collection

zchocolat

zchocolat

Red Velvet Lava Cakes

Red Velvet Lava Cakes.

Red Velvet Lava Cakes are a great dessert idea for Valentine’s day… not as sweet as a red velvet cake, pretty fast to make and very delicious!

Ingredients:

  • 8 tbsp (1 stick) unsalted butter
  • 4 ounces white chocolate
  • 1 cup confectioners’ sugar
  • 2 large eggs
  • 2 large egg yolks
  • 1 tbsp red liquid food coloring
  • 2 tbsp natural unsweetened cocoa powder
  • 6 tbsp all-purpose flour
  • confectioner’s sugar, for dusting
  • Whipped cream, strawberries or raspberries to decorate
  1. Set a rack in the center position and preheat the oven to 450 degrees. Spray 4 6-ounce ramekins with nonstick cooking spray.
  2. Melt the butter and white chocolate in the top of a double boiler, stirring until smooth. When completely melted, stir in the confectioners’ sugar. 
  3. Lightly whisk the eggs and egg yolks in a large bowl. Stir in the red food coloring and melted chocolate mixture.
  4. Whisk the cocoa and flour in a  small bowl to combine. Add to the batter and stir until just combined.
  5. Divide the batter evenly among the ramekins. Place the ramekins on a  baking sheet and bake until the sides of the cake are set but the centers are still soft , 14 to 15 minutes. Let the cakes rest for 2 minutes, then invert them onto dessert plates.
  6. Serve the cakes immediately, dusted with confectioners’s sugar and with berries and whipped cream.

2136072

Ecco a voi la ricetta dei Red Velvet Lava Cakes, delle mini torte dal gusto red velvet e col cuore tenero…

Ingredienti:

  • 8 cucchiai di burro
  • 1/2 bicchiere di cioccolato bianco
  • 1 bicchiere di zucchero a velo
  • 2 uova
  • 2 tuorli
  • 1 cucchiaio di colorante alimentare rosso
  • 2 cucchiai di cacao amaro
  • 6 cucchiai di farina
  • zucchero a velo, panna montata, fragole o lamponi per decorare

Preriscaldate il forno a 230°c e imburrate dei pirottini di alluminio o ceramica.

Sciogliete il burro con il cioccolato bianco a velo e una volta sciolti aggiungete lo zucchero a velo.

In una ciotola a parte sbattete leggermente le uova con i tuorli, aggiungete il colorante rosso e poi il composto di cioccolato bianco. Aggiungete farina a cacao.

Dividete l’impasto tra i pirottini ed infornate fino a quando i bordi sono fermi ma il centro sono ancora morbidi, circa 15 minuti. Fateli raffreddare un paio di minuti poi capovolgete i pirottini per sformarli e decorarli!